This post is about a visualization tool I developed in an attempt to show how change-ringing methods sound different from each other. Here I’ll look specifically at the minimus version.
There are eleven plain minimus methods that contain all 24 permutations of four in their plain course. In change-ringing terms, the plain course is the extent. But these methods have different rates of change between rows, giving them each a slightly different sound as well as a different feel when ringing them.
From a given starting row, there are only four possible changes in minimus:
1. Swap the first pair
| 1 | 2 | 3 | 4 |
| 2 | 1 | 3 | 4 |
2. Swap the second pair
| 1 | 2 | 3 | 4 |
| 1 | 2 | 4 | 3 |
3. Swap both pairs at once
| 1 | 2 | 3 | 4 |
| 2 | 1 | 4 | 3 |
4. Swap the inside pair
| 1 | 2 | 3 | 4 |
| 1 | 3 | 2 | 4 |
The 24 permutations of four can be laid out on a cube so that the rows closest together are those connected by these four changes. Here is the cube face that includes rounds (1234); the circled numbers correspond to the four changes listed above.
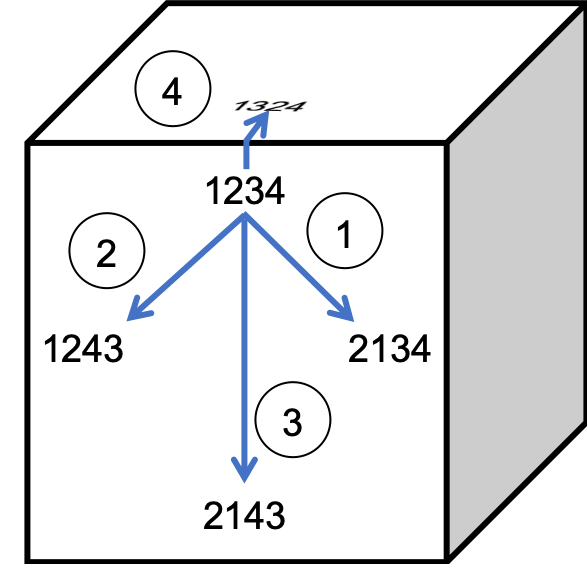
One thing to note is that changes 1, 2, and 4 only involve one pair of bells swapping, while change 3, the cross change, involves two pairs swapping. It’s also just doing changes 1 and 2 simultaneously. Minimus methods with more cross changes are the ones with faster overall rates of change.
Here’s what the entire cube looks like, unfolded:
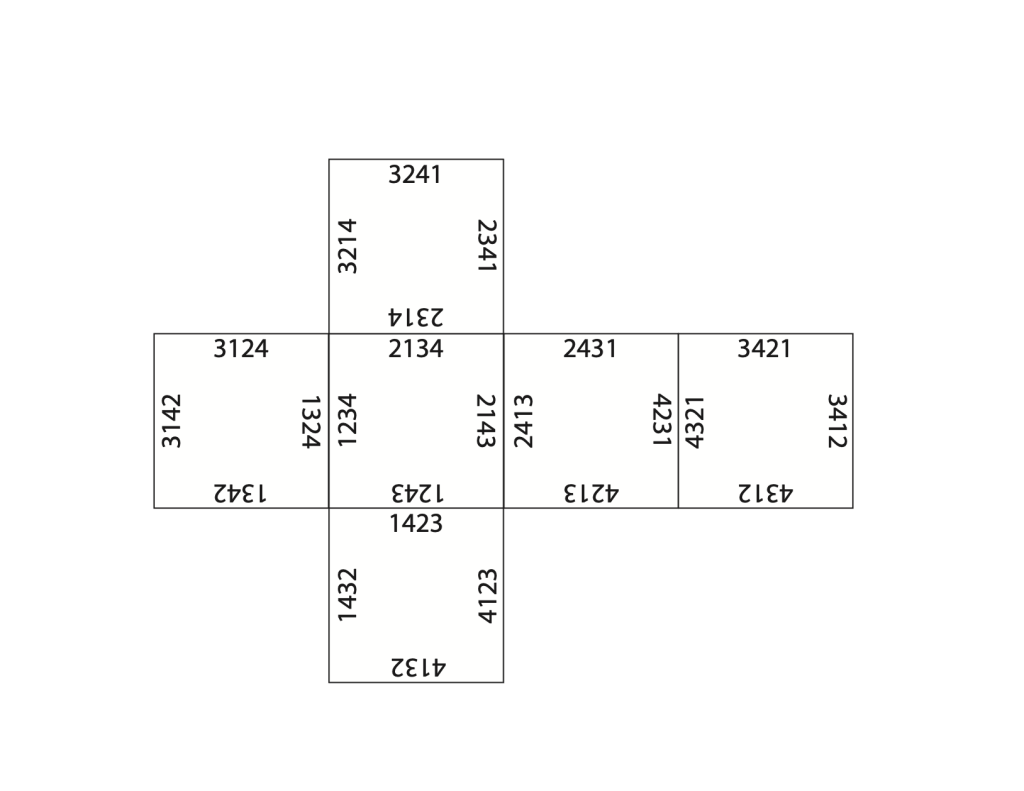
Different minimus methods can be understood as different paths on this cube. Ringers are used to thinking about “paths” of methods, but we’re usually focused on the role of a single bell or perhaps a pair of handbells, rather than entire rows. For example, here’s Plain Bob Minimus and Double Canterbury Place Minimus as typical method grids:


As the place notation to the left of each method indicates, Plain Bob has both pairs crossing frequently while Double Canterbury never does! This translates into Plain Bob sounding more varied and feeling faster to ring, while Double Canterbury has more incremental changes from row to row.
I’ve rung these two methods along with their animations on the cube. Check out the videos below, and also check out this codepen where you can navigate around the cube yourself. If you find it difficult to keep track of when each row ends and the next begins, it might be helpful to try following along on these contour graphs or even staff notation. (I’ll write more about these tools in some later posts!)
The amount of variation possible between minimus methods is pretty limited. It gets much more exciting with even two more bells. Stay tuned for a post showing how this cube gets extended to represent minor methods and more!
