Handling a bell is complicated. Part of what makes it difficult to understand is just that it is a series of actions, and many components and consequences of the actions aren’t visible.
But we can make visual representations of things, and sometimes that can be a big help with understanding!
Look at this cute little guy

This little guy comes from the Fortran Friends website where you can also see six of them ringing in rounds!!
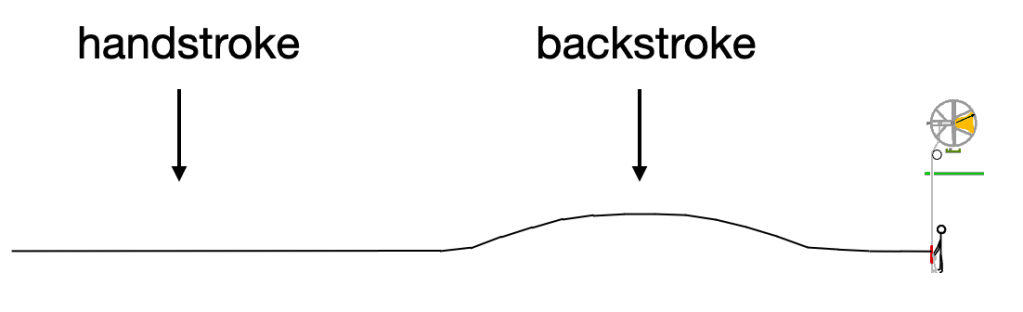
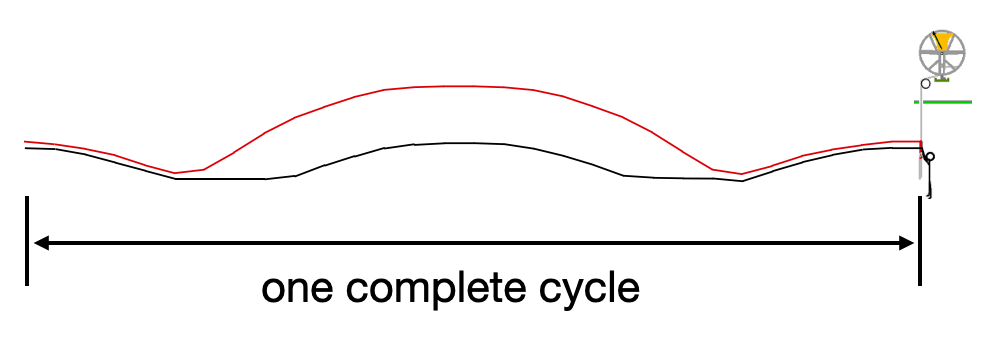
I have added some lines

These lines are basically graphing the sally height (in red) and the hand height (in black) over time.
This is my one weird trick! Unfortunately not one weird trick to magically do handling perfectly—good handling has too many little components that are all important.
BUT! This animation makes it easy to SEE a whole lot of the little components and how they relate to each other. Let’s get into it!
Some features of the lines

The red line alternates between a low bump for the handstroke and a taller bump for the backstroke.

Each bump is like a little hill that is steep near the bottom, but levels off near the top. How steep the slope of the hill is in the diagram corresponds to how fast the rope moves. Over the course of a single backstroke, the rope goes (in broad terms) fast—slow—slow—fast, with the first pair, fast—slow, as the rope goes up and the second pair, slow—fast, as the rope comes down.
Both handstrokes and backstrokes have this structure—the rope moves fast at the bottom of its swing, when your hands are in front of your body, and slower near the top, when your hands are above your head. In this diagram it’s clearer on the backstroke.
In my opinion, being able to feel these speed changes in the rope and match the speed of your hands to the speed of the rope is the most important aspect of handling a bell. Ringing mostly doesn’t require strength, and even in the moments when you do want to pull firmly, I would argue that timing is more important than strength. An efficient pull is one where you pull—feel tension in the rope—for as long as possible, which means matching the speed of the rope as it changes! Knowing approximately what the speed changes are likely to be can be very helpful, but the thing to work on is feeling what the rope is doing so that you can respond to what is actually happening rather than what you think should be happening.

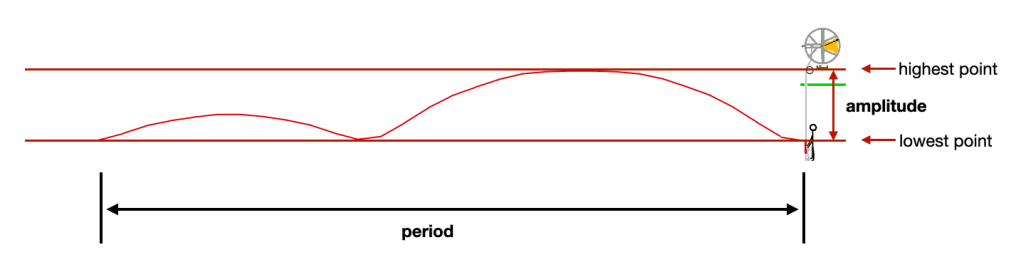
In this animation, there’s a clear section where both lines are horizontal in the middle of the backstroke hill. This corresponds to the bell being at its balance point—perfectly upright, as high as it can go. The ringer’s hands are also as high as they can go. If your bell reaches the balance point, theoretically you can choose how long this flat portion lasts.
(Potentially a sign that this animation is not entirely accurate is that the flat section at the top of the backstroke is much clearer and longer than the little flat section at the top of the handstroke. In general I expect to wait longer at the balance on handstrokes than on backstrokes [because of the handstroke gap]. But the concept is the same on both strokes!)
Consider the hands
If we look for a moment at just the line for the hands…

…the two little hills appear nearly identical!
This is good handling. You want your hands to go all the way up on both strokes, and all the way down on both strokes.
There are flat sections between the two hills, where your hands are down low while you wait for a section of the rope movement. This is also good handling! You don’t want to bring your hands up ahead of the rope. Even though you bring your hands up to catch the sally, it’s safest—and most relaxing!—if you keep them low as long as possible and bring them up quickly just in time for the catch.
Unlike the flat bits at the top, you can’t choose how long these sections last—your hands aren’t moving, but the rope is and will dictate when your hands should start moving again! Well, one of these sections you do choose how long it lasts, by choosing when to catch the sally. In the other one you want to be ready to move your hands with the rope, whenever that is.

One of these flat sections, the one after releasing the sally and before the hands begin to rise for the backstroke, is the ideal time for adjusting where you’re holding the tail.
When you first start learning to ring, the graph for your hands looks like this:
Instead of two hills, there is only one, and a long flat section while the teacher does the handstroke.
Wanna know a secret?? You can just ring many bells this way, without anyone doing the handstrokes, and if you do the backstrokes well (meaning with good timing and bringing your hands all the way down, a “good pull” in this case does not mean pulling hard), nothing disastrous will happen! I don’t mean that you should do this. But if you’re having a moment of feeling overwhelmed by all the little bits that go into handling, it’s FAR safer to focus on backstrokes at the expense of handstrokes than the other way around.
In handling terms, I tend to think of “putting both strokes together” as like adding toppings (the handstroke) to my frozen yogurt (the backstroke), rather than combining two equally important ingredients (handstroke and backstroke) to make a new food. Keeping the rope safe and controlled is almost entirely done with the backstrokes. Handstrokes provide a helpful boost in precision, but that is building on the foundation provided by backstrokes.
Bell “speed” means bell period
When ringing a bell, it is literally moving most of the time, so has a speed above zero.
However, when ringers talk about the speed of a bell, we almost always mean something else!
Bell speed usually refers to the amount of time it takes to complete a whole cycle, or half the cycle corresponding to one stroke. In mathematics and physics terms, this is the period of the bell motion. We don’t usually talk about it in concrete enough terms for it to matter whether we mean the whole cycle, two strokes, or half the cycle, one stroke.
Now that I’ve said that, let me talk about it in very concrete numerical terms for a moment:
The original animation is 3.6 seconds long, or about 1.8 seconds per stroke (the handstroke and backstroke are usually slightly different durations but I won’t go into that here). That works out to about 33 strokes per minute. A metronome marking of 33 bpm is very slow, but that’s rather fast for ringing—it’s common to say ringing a peal takes around 3 hours, but 33 rows per minute would get a peal rung in only about 2.5 hours! Remember also that the 33 bpm figure is for only one bell. The time between one bell striking and the next bell striking is MUCH smaller than the time between one bell striking and that same bell striking again. On six bells, 1.8 seconds per stroke corresponds to 200 strikes per minute!
Okay, back to the more typical and less numerical version…
Ringing in rounds involves getting a group of bells all going at the same “speed”, not in the sense of bell velocity, and not that anyone is necessarily measuring how many seconds per stroke, just that we want the time between handstroke strike and backstroke strike to be the same for every bell, and the time between backstroke strike and handstroke strike to also be the same for every bell! Which also means the time between each handstroke strike and the next handstroke strike should be the same for every bell, and the time between starting to pull the handstroke and starting to pull the next handstroke should be the same for every bell.
If you look at the Fortran Friends animation of rounds on six that I mentioned at the beginning of this post, you might notice that all six bells are exactly the same size. This is not how real bells work, but it’s definitely much easier to make an animation that way! I will leave the complications of different size bells to a future post.
So far all of my diagrams have focused on movement through space without reference to sound. The black circles in the image below are *approximate* indications of when the bell strikes, when the sound happens.

The strike is much closer to the start of the next pull than to the start of the current pull. On both strokes it happens around when your hands are moving upward past your face. The diagram helps show this—the dots are both a little bit after the hand line starts going up, and approximately at the level of the little ringer’s head!
Meet the bell where it is
I remember being taught once that when riding a horse, I should look where I want to go and that will automatically cause most of what’s needed for steering.
Unfortunately, there’s no equivalent of this in ringing. Wanting to ring at a particular speed, or even moving your arms for a particular speed of ringing, is not enough to cause a bell to actually go at that speed. You have to meet the bell where it is and then bring it somewhere else if needed.
The order of both operations and priorities that I tell learners when ringing in rounds, and believe I still follow myself, is:
- Ring the bell steadily, with my best technique.
- Assess whether my speed matches the others and adjust if needed.
Improving as a ringer and gaining familiarity with specific bells means that I can move from step 1 to step 2 almost immediately, and that I have a wider range of speeds to choose from to start out with than a learner will. But the process is the same.
Changing speed
Changing the speed of a bell (i.e. its period) is necessary for ringing call changes and methods, and for correcting mistakes, in call changes, methods, or just rounds.
Okay, so how do we do it?
Sometimes you can change speed simply by changing how long you hold the bell at the balance point, on either or both strokes.

This approach is often needed for lighter bells, especially when ringing on higher numbers of bells.
But if your bell isn’t getting all the way up to the balance point, that’s not an option.
(Well, even if the bell is a little below the balance point, you might be able to wait at the top a bit longer than you think! I am sometimes surprised by how long it takes for a bell to turn around. When below the balance, simply waiting a tiny bit more or less can only make small adjustments in your bell speed, but sometimes that’s all you need.)
In general, you change the period of your bell by changing the amplitude, or how high the bell and rope swing. And you change that by changing how much you pull.
Pull more ➞ bell & rope swing higher ➞ slower ringing speed
Pull less ➞ bell & rope don’t swing as high ➞ faster ringing speed
It may not be easy, but it mostly is that simple!
You can adjust the amount of pull separately for handstrokes and backstrokes, and therefore have slightly different ringing speeds for the two strokes. There’s a limit to how uneven you can make the ringing, but it’s very good to be able to make small adjustments to one stroke independently of the other. How much you pull the handstroke affects how high the bell swings at backstroke, and how much you pull the backstroke affects how high the bell swings at handstroke. I wrote a little bit about how the pulls affect the opposite stroke here.
Keep the hand amplitude at max!
Up above I said that the graph of hand height represents good handling, because the hands go all the way up and all the way down on both strokes. Using your full vertical wingspan enables the greatest awareness of what the bell is doing and the greatest efficiency and precision in making adjustments. So you want to keep your hands going all the way up and all the way down even as you change how high up the bell and rope swing!

The rope amplitude can be changed and needs to be changed sometimes. The hand amplitude can be changed, but should not be!
When you change the rope amplitude, you probably also need to change where you’re holding the rope, so that the hand amplitude doesn’t change.
| Problem caused by no adjustment | Solution | |
| pull more, rope goes higher | rope pulls you up onto your toes! | let out rope catch sally lower |
| pull less, rope goes less high | hands don’t go all the way up | take in rope catch sally higher |
Pulling and checking
When I talk about pulling more or less, I mean specifically adjusting the amount of tension you feel between your hands and the rope as both are moving downward. You are pulling in the same direction the rope is already going—downward. This corresponds to the portions of line above the little curly brackets:

Because I’m trying to keep my hands moving in time with the rope no matter what, instead of telling myself to pull more or less I often find it easier to try starting my pull a tiny amount earlier or later. If I start a hair earlier, I’m anticipating what the rope does, creating more tension or a stronger pull. If I start a hair later, my hands will move with the rope rather than pulling it.
There is another tool available for adjusting how high the rope goes and the resulting bell speed. This is often called checking (“check” as in “stop”), meaning resisting the rope as it moves upward, in the portions over the square brackets:

I am not a fan of checking. Aside from ringing down, I mostly consider checking to be a tool for compensating when I’ve pulled too much. The heavier a bell is, the more difficult it is to compensate for overpulling, so the more valuable it is to pull precisely in the first place and not need to check. I’m not that strong and I don’t like to work hard, so I try to keep my resistance to the rope as it moves up at a minimum and focus entirely on adjusting how much I pull as the rope moves down. I will check a bell to prevent the stay from bumping against the slider, and I believe that is an important skill to have, but it is not actually good to have to use that skill—it is a sign that I pulled the previous stroke too much!
Not all ringers share my overall negative view of checking, but I think most would agree with me that it’s good at least to be in control of any checking you do. Pulling hard and checking hard is, in Ian Bell’s words, like hitting the accelerator and the brake at the same time—it cancels out your own effort! I’ve seen a lot of learners in the past couple years inadvertently check the bell after a gentle handstroke, because they weren’t actually ready for the bell to speed up so were sluggish allowing their hands to go up for the backstroke. In many cases the combination of a gentle pull AND checking causes the bell to speed up much more than desired, sometimes to a point that is alarming to a new ringer! So it’s good to pay attention to the amount of tension in the rope as it moves up and learn to adjust it independently of other things, and keep adjustments of other things from causing alterations in that amount of tension. Checking that takes the form of simply preventing your hands from going up as far as they can should definitely be avoided!
Am I stopping the rope from going up?
I feel so strongly about checking and stopping the hands and rope from going up that I wrote an entire post about it two-ish years ago and used it as an example toward the end of this post. Above I stated that the way to ring more slowly (if the bell is below the balance point) is to pull a bit more, and that if your hands aren’t going all the way up the solution is to take in rope and/or catch the sally higher. But actually, the first thing I do in both of those scenarios—1) I want to ring more slowly or 2) my hands aren’t going all the way up—is ask myself if I’m stopping the rope from going up as far as it can. Only when I’m sure the answer is “no” do I move on to the solutions mentioned earlier!
I follow the same procedure when working with learners. If someone is letting the rope go up as much as possible and their arms aren’t extending all the way up, it doesn’t usually hurt to make sure that they’re letting the rope go up before telling them to take in rope (the exception might be if this particular learner has a tendency to move their hands up too quickly). In contrast, if the person *is* stopping the rope from going up, getting them to take in rope can easily make the problem worse. They were already responding to the rope’s upward pull with resistance; now there will be even more upward pull! If the problem is preventing the rope from going up as much as it can, the solution is to figure out how to stop that, not try to cancel it out.
Putting it all together
Okay let me climb down off my soapbox and look at the big picture again!
Here is what I think I’m thinking when ringing most bells:

Most of the time I’m just trying to keep a very small amount of tension in the rope so that I can feel the changes in speed (literal speed, not period in this case!) and the rope doesn’t go floppy. The biggest variations happen in the handstroke pull. On most bells backstroke pulls are variations on gentle. Dodges can require more variation and heavy bells might need actually strong backstroke pulls.
I haven’t (yet!) made versions of this diagram showing different ringing speeds (apart from just waiting less at the balance point), and adjusting where you hold the rope to match. For now, consider this set of controls for four different components of handling:
Most of the time only the middle two of these should vary. I put them in the order I believe they should be attended to:
- First, try to keep resistance as the rope goes up just above “none”.
- Vary the amount of pull as needed to adjust the speed of your bell.
- Adjust how high on the tail your hands are and/or how high on the sally you catch it, so that…
- …your hand amplitude is always at maximum!
Handstroke and backstroke should each have their own set of four controls, and the slider for amount of pull needs to be set separately for the two strokes. When you change the amount of pull, the next slider (hands on sally/tail) will need to change in the opposite direction to keep the hand amplitude at max. Also, changing the pull slider means you need to change the hand location slider for the other stroke.
Let me spell that all out:
Pull handstroke more ➞ rope goes higher at back ➞ need to let out rope (hands closer to end of tail)
Pull handstroke less ➞ rope goes up less at back ➞ need to take in rope
Pull backstroke more ➞ rope goes higher at hand ➞ need to catch sally lower
Pull backstroke less ➞ rope goes up less at hand ➞ need to catch sally higher
A digression on breaking stays
On the third control in the image I included a red section at the bottom labelled “bounce risk”. This refers to bouncing the stay off the slider. It could also be accurately called the danger zone for breaking the stay! I think the danger zone properly belongs at the top of the pull control—very strong pulls are for ringing a bell up, not for ringing a bell that *is* up.
But while “amount of pull” can’t really be seen, it’s pretty easy to identify where on a given rope is the danger zone for a particular individual. When the bell is set, on either stroke, you simply look at where your hands are in order to pull off. That is the lowest your hands should be; below that is the danger zone. Normal ringing will use a section just above that point, or above and including that point depending on the bell and what you’re ringing. If you have to catch or hold a lot above that starting point to enable your hands to go all the way up, that means the bell has come down a bit. Sometimes you want this, most obviously when ringing a bell down! If the bell hasn’t come down and you catch/hold a lot above the starting point anyway, the rope might pull you off your feet! Or if the bell is light enough, you will simply bring it down by catching so high.
Here is a rough illustration of these catch zones on a sally:

The boxes for “good” and “too high?” are extremely approximate in size! The correct place to catch the sally is wherever will allow your hands to go all the way up, unless that place is in the danger zone, in which case you should catch in the good zone and prevent the stay from bumping the slider AND BE GENTLE ON THE NEXT BACKSTROKE. Catching in the danger zone doesn’t cause risk to the stay, it reveals that there already IS risk to the stay from having pulled too hard.
What next?
If you’ve gotten this far, congratulations! And thank you. This post is long, but I don’t think I’ve fully exhausted the explanatory potential of the animation I started with. Topics I hope to explore a bit more in the future include:
- how the graphs change when ringing a bell up and down
- graphs for different sizes of bells
- getting different size bells to ring at the same speed
But for now, that is all.
